⚙️ Post-Installation Setup

AI Engine is installed.
Let's get it configured.

Follow these steps to set up AI Engine for your Salesforce org. The whole process takes about 20–40 minutes.

🎁
5-Day Free Trial Included — Every new installation of AI Engine includes a fully functional 5-day trial. All features unlocked, up to 3 users. No credit card required to start.
0 of 0 steps complete
0%
1
Assign Permission Sets
Give your users access to AI Engine

AI Engine uses two Permission Sets to control access. Assign them to the right people before anything else.

Assign AI Engine Admin Permission Set
Setup → Permission Sets → AI Engine Admin → Manage Assignments → Add the Salesforce admin user
Assign AI Engine User Permission Set
Setup → Permission Sets → AI Engine User → Manage Assignments → Add all users who will use AI Engine
ℹ️ 1 admin is included free. Additional admins count toward your user limit. Users must have the Permission Set assigned before they can use AI Engine.
2
Create Named Credential
Connect your AI provider (OpenAI, Claude, or Azure)

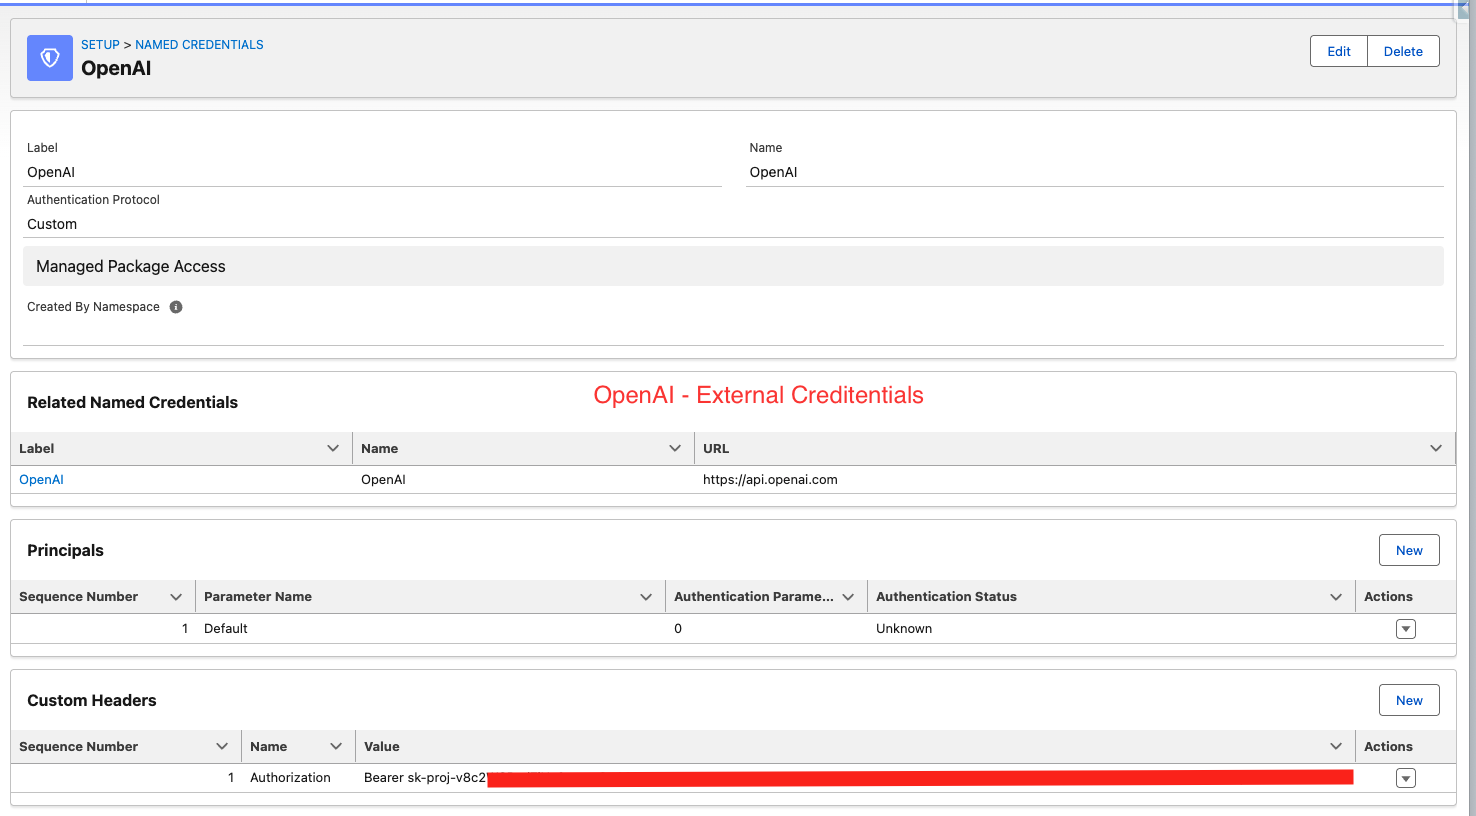
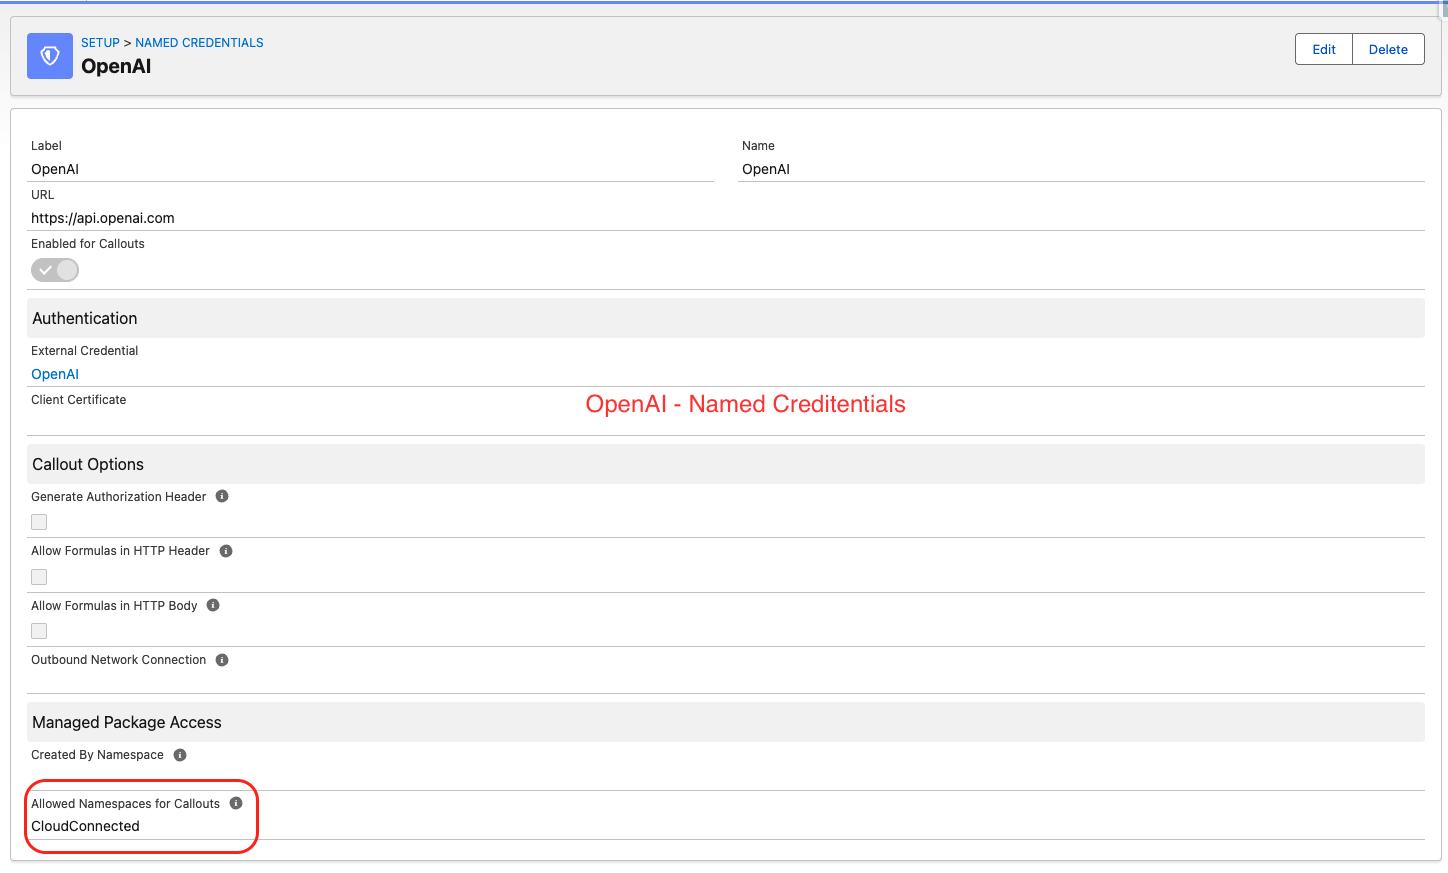
AI Engine needs a Named Credential to connect to your AI provider. You'll need an API key from OpenAI, Anthropic, or Azure.

🔴 Critical: After creating the Named Credential, you MUST add CloudConnected to the Allowed Namespaces for Callouts field on the External Credential. Without this, AI Engine cannot make calls to the AI provider.
Create External Credential
Setup → Named Credentials → External Credentials → New → Authentication Protocol: Custom → Save
Add Authorization Custom Header
On the External Credential → Custom Headers → New → Name: Authorization → Value: Bearer YOUR_API_KEY
⚠️ Add CloudConnected to Allowed Namespaces
External Credential → Edit → Allowed Namespaces for Callouts → type: CloudConnected → Save
Create Named Credential
Setup → Named Credentials → New → Label: OpenAI (or Claude) → URL: https://api.openai.com → External Credential: select the one you created → Save
Add Principal to External Credential
External Credential → Principals → New → Identity Type: Named Principal → Save. Then assign the Named_Credentials Permission Set to your users.
ℹ️ For Claude (Anthropic): URL is 
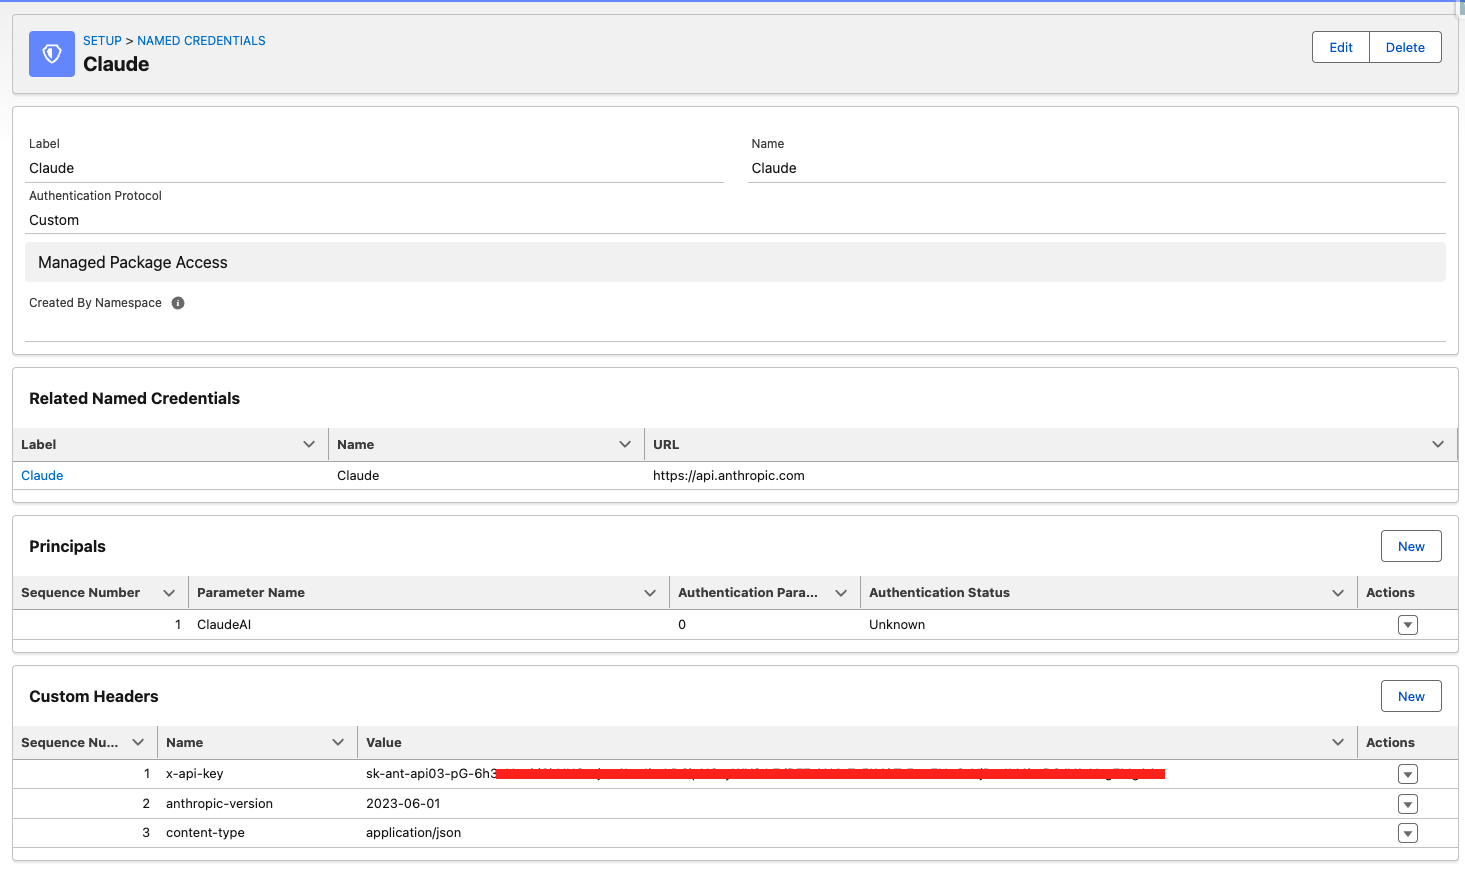
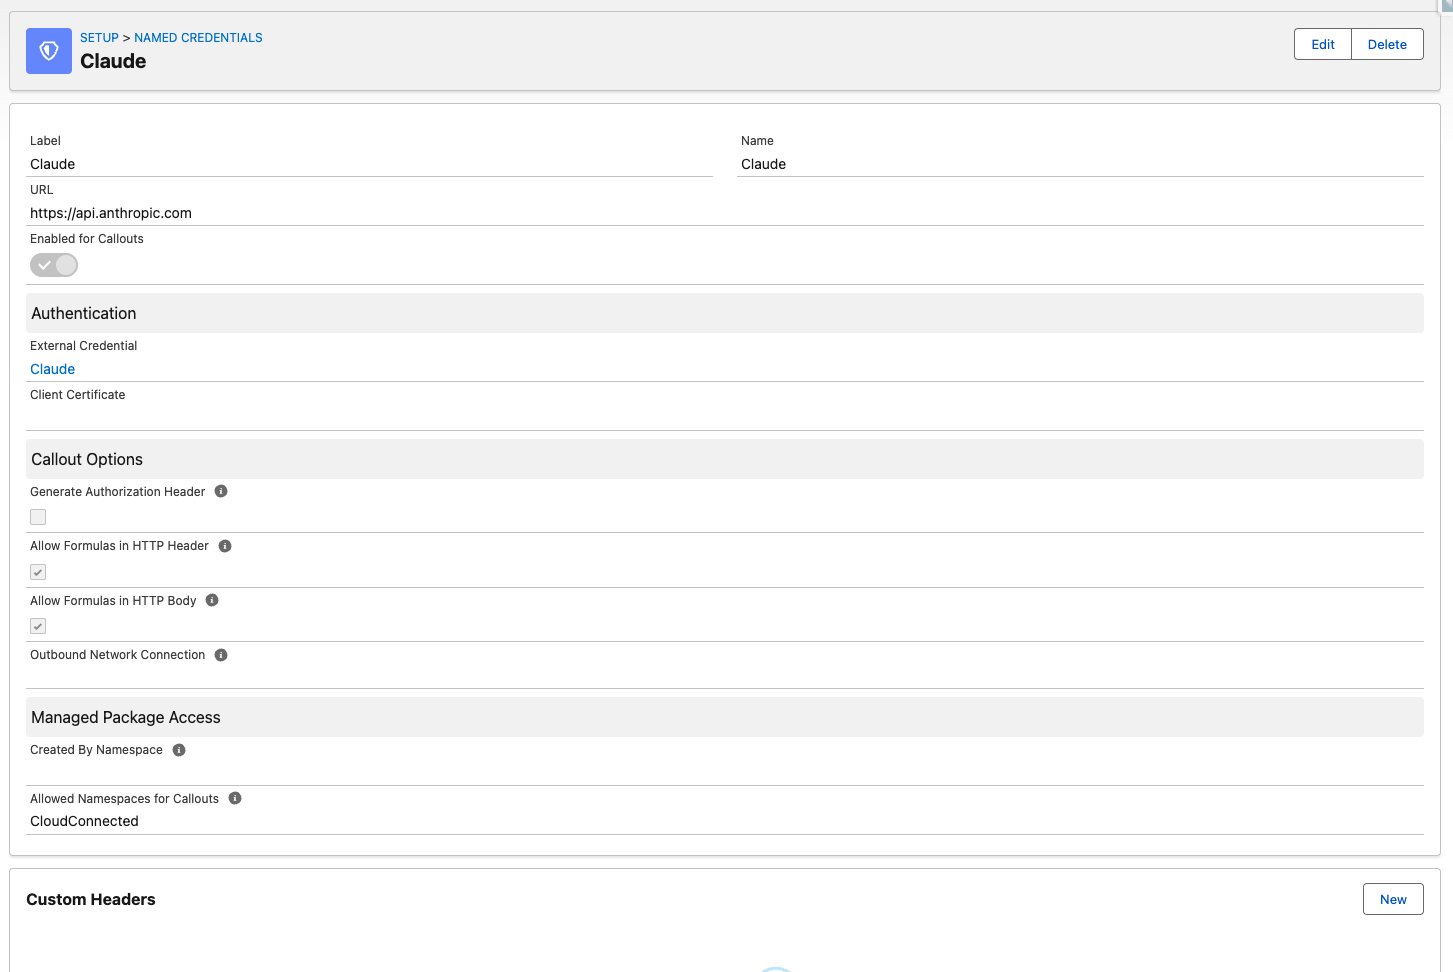
https://api.anthropic.com — also add headers: anthropic-version: 2023-06-01 and content-type: application/json.
For Azure OpenAI: use your Azure endpoint URL and api-key header instead of Authorization.

📸 Reference Screenshots — How it should look when correctly configured

OpenAI External Credentials configuration in Salesforce
OpenAI — External Credentials
OpenAI Named Credentials configuration in Salesforce
OpenAI — Named Credentials
Claude External Credentials configuration in Salesforce
Claude (Anthropic) — External Credentials
Claude Named Credentials configuration in Salesforce
Claude (Anthropic) — Named Credentials
💡 Key things to verify: Allowed Namespaces = CloudConnected (red box in OpenAI Named Credentials screenshot), correct URL, and API key in Custom Headers.
3
Configure Org Profile
Set up AI provider and company information

Open the AI Engine Admin Panel and configure the Org Profile tab. This is the core of AI Engine — it tells the AI who you are and how to respond.

Open AI Engine Admin Panel
App Launcher → search "AI Engine" → open the app → go to Admin Panel tab
Set AI Named Credential
Org Profile tab → AI Named Credential → enter exactly the Name of your Named Credential (e.g. OpenAI or Claude — case sensitive)
Select AI Model
Enter model name: gpt-4.1, gpt-4.1-mini, claude-sonnet-4-5-20251001, etc.
Select AI Mode
OPENAI_COMPAT for OpenAI/Azure, ANTHROPIC for Claude
Fill in Company Description
Describe your company, products/services, and target customers. The more detail, the better the AI responses.
Fill in Sales Process
Describe your sales stages, qualification criteria, and lead priorities.
Fill in Email Guidelines (optional)
Tone, style, rules for email drafting. E.g. "friendly, professional, max 150 words, always propose 2 meeting slots".
Save Org Profile
Click Save and verify Active is checked.
4
Configure Agent Objects
Tell AI which Salesforce objects and fields to use

Agent Objects define which Salesforce objects AI Engine can analyze and query. Add the objects your team works with most.

Go to Agent Objects tab in Admin Panel
Admin Panel → Agent Objects tab
Add your key objects
Click New → enter Object API Name (e.g. Lead, Account, Opportunity, Contact) → add a Label and Description → select fields → Save
Select relevant fields for each object
Only include fields useful for AI analysis. Fewer, more relevant fields = better AI responses. Avoid adding all fields.
Configure child objects (optional)
For Account, add child objects like Opportunity or Contact so AI can see related records. Format: ObjectName:field1,field2;ObjectName2:field1
Mark objects as Active
Only Active objects are available to AI Engine. You can enable/disable objects at any time.
⚠️ Keep field lists focused — adding 100+ fields per object can cause performance issues. Aim for 20–40 most relevant fields per object.
5
Add Prompt Templates (optional)
Create custom AI actions for your team

Prompt Templates are custom AI actions that appear as buttons on record pages. AI Engine has built-in defaults but you can create your own.

Go to Prompt Templates tab in Admin Panel
Admin Panel → Prompt Templates tab
Create a Record Summary template
Action: record_summary — returns structured JSON with highlights, risks, fit signals. Use {playbook} and {context} placeholders.
Create additional custom templates (optional)
Email drafting, next steps, qualification scoring, visit report summaries — anything your team needs.
// Example: Record Summary prompt template {playbook} Analyze this Salesforce record and return structured JSON. RECORD: {context} Return ONLY valid JSON: { "quickAssessment": "2-3 sentence summary", "highlights": ["fact 1", "fact 2"], "missingInfo": ["missing 1"], "risks": ["risk 1"], "fitSignals": ["signal 1"] }
6
Add AI Engine to Utility Bar
Make AI accessible on every page

AI Engine Sales Agent lives in the Salesforce Utility Bar — it needs to be added to your Lightning App to be visible to users.

Open App Manager
Setup → App Manager → find your Lightning App (e.g. Sales) → Edit
Add Utility Item
Utility Items tab → Add Utility Item → search "salesagent" or "AI Engine" → add it → set label "AI Engine" → Save
Test the Utility Bar
Open a Lead or Account record → click AI Engine in the bottom utility bar → verify it loads correctly
7
Test & Verify
Confirm everything is working correctly

Before rolling out to your team, run a quick test to confirm AI Engine is working end-to-end.

Open a Lead record and click Record Summary
Should return a structured AI analysis within 5–10 seconds. If timeout — check Named Credential and Allowed Namespaces.
Test the Sales Agent chat
Open utility bar → type "How many leads do I have?" → should return a count from your Salesforce data
Test email drafting
Open a Lead → click Draft Email → should generate a professional outreach email based on the record context
Check License tab
Admin Panel → License tab → should show Trial status with days remaining and user count
⚠️ If you see "AI provider timeout" — the most common cause is missing CloudConnected in Allowed Namespaces on the External Credential. Double-check Step 2.
🎉

AI Engine is ready!

Your setup is complete. Your team can now use AI on every Salesforce record.
Need help or want to activate your license?

Contact Cloud Connected →
Screenshot